Science Projects for Beginners: Biology Projects
Biology Projects
Which Foods Do Molds Love Best?
You run into the kitchen after a hard morning on the soccer field, and you're so hungry you can't wait to eat. You grab the bread from the bread drawer and the cheese from the fridge. You get some juice and some potato chips, and you're ready to make a yummy cheese sandwich—your favorite!
But when you pull out a couple of slices of bread, you find that there's something green and disgusting growing on them. And then you notice that the cheese is covered with little white spots. Yuk! What the heck is it?
It's mold. It not only looks gross on foods, some kinds of it can make you sick if you eat it. Where did it come from? How did it get on your bread? Is it growing on any other foods in your house? It wasn't on the chips. Or in your juice, either. But what about those cookies you stashed under your bed a week or two ago? Or the beef jerky your brother keeps in his desk drawer? Will those foods be moldy when you go to retrieve them? Yikes!
The facts are that molds grow better on some foods than others, and that various factors contribute to their growth. You'll be learning a lot about molds in this section. Are you ready to get started?
So What Seems to Be the Problem?
In this project, you'll be trying to figure out on what kinds of foods, and under what conditions, molds grow best. Working in an orderly, organized manner, you'll conduct an experiment that will help you to solve the problem.
You'll learn a lot about molds as you work through this project. You'll find out, for instance, if they prefer light or darkness, wet foods or dry foods, and heat or cold. You may be able to figure out when you've finished why there was mold on the bread and cheese you planned to use for your sandwich, but not on the potato chips.
Basic Elements
According to the U.S. Department of Agriculture, molds are microscopic fungi that live on plant or animal matter. Unlike bacteria, which are one-celled, molds are made of many cells. When viewed under a microscope, molds look like skinny mushrooms.
If you want to, you can use the title of this section, “Which Foods Do Molds Love Best?” as the title of your science fair project. Or you can think up your own title, or use one of these:
- Comparing the Growth Conditions of Molds
- Where and How Do Molds Grow Best?
Once you've got a clear idea of the questions you'll be trying to answer, keep reading to learn a little bit more about mold, and to think about the point of this science fair project.
What's the Point?
Why do we care about how mold grows? Or care about mold at all, for that matter? Wouldn't it be better to just ignore this mold business and hope it goes away?
For starters, scientists think that molds have been around for about three billion years, making it highly doubtful that they'll disappear anytime soon.
Scientific Surprise
Penicillin, the original antibiotic, was discovered in 1929 by Dr. Alexander Fleming. Fleming learned that penicillin had the ability to stop the growth of a colony of germs placed into the same petri dish. Other doctors and scientists expanded on Fleming's discovery and penicillin eventually became known as “the miracle drug.”
Second, the study of molds has led to much knowledge and many benefits, including the discovery of penicillin, a medicine obtained from a mold called Penicillium notatum. Penicillin was the first antibiotic drug used, and is credited with saving countless lives. Other beneficial molds are those used to age and flavor cheeses (think blue cheese), and those used to make soy sauce.
If you like to drink soda, you need to give credit to the molds that manufacture the citric acid used to flavor many soft drinks. And certain types of fungi are used to improve soil conditions for farming.
The study of molds also has revealed which ones are dangerous and should be avoided. Some molds can cause allergic and respiratory problems, while others produce toxins that can be extremely harmful—even in small amounts.
You've probably already encountered quite a few molds and fungi, some of which can be quite surprising. Listed below are a few facts you may not have known.
- If you have, or ever have had, athlete's foot, you can blame a fungus for your misery.
- The mold that grows on bread is called black mold, even though it doesn't always appear black.
- If you ever see a white fungus growing on the tropical fish in your aquarium, watch out. That fungus can be harmful, and sometimes even fatal to fish.
- Did you know that the mushrooms on your Friday night pizzas are actually a type of fungus?
- Warm, damp conditions in your bathroom make it the perfect breeding spot for a mold we commonly refer to as mildew.
- Slime mold—wouldn't you love to get a look at that?—is a type of mold that's primarily found in damp, moist woodlands. It grows on decaying logs and leaves.
- Certain large trees and ornamental plants like roses can become infected with a variety of fungus diseases, leaving the plants helpless to overcome the blight.
- A terrible fungus called Phytophthora infestans struck and destroyed Ireland's potato crop in the years between 1846 and 1850, causing more than one million people to starve to death and millions more to flee the country. That period became known as the Irish Potato Famine.
As you can see, there are many practical reasons to learn about molds and fungi. They have affected people, animals, and plants for thousands of years, and will continue to do so.
Knowing how molds grow on and affect the foods you eat can help you protect that food, and prevent or slow down the damage caused by molds.
Explosion Ahead
Molds and fungi produce and release tiny spores, some of which can cause allergic reactions, asthma, and other problems for humans. For that reason, it's not a good idea to allow mold to be exposed within your home, and that's why you'll enclose the foods on which you want to grow mold in sealed bags.
In this science fair project, you'll work with five samples each of three different foods: bread, cheese, and oranges.
Your control group is those foods, as they are normally found in your house. For instance, the cheese control would be the cheese that's normally kept in your refrigerator. The bread would be the loaf stored in the plastic bag it comes packed in, and the oranges would be those that are kept in your house in the fridge or in a basket or bowl on the counter.
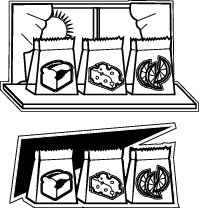
The variable group you'll work with is the same foods, but they will be sealed in zipper-lock bags and placed in different areas of your home. You'll need to create different environments in which to store the foods in order to conduct your experiment.
What Do You Think Will Happen?
Basic Elements
Every living thing has an environment. The environment is all the conditions, circumstances, and influences that surround and affect the development of an organism. Environment is important to every living creature—from molds to humans.
Every home has areas with different temperatures and humidity levels. Your bathroom, for instance, is a humid spot. If your home has an attached garage, it's probably cooler than inside your house. The inside of a dresser drawer that's rarely opened has a different environment than the kitchen. The windowsill on which the sun shines every morning is much different from the damp, dark cellar.
In this experiment, you'll be locating five different growing environments within your own house. Look for locations that are dry and dark, cold and dark, moist and warm, brightly lit, dark and damp, and so forth.
Standard Procedure
Be sure to check with an adult before you start putting food samples in the bathroom or a bureau drawer. And be sure to place the bags where they'll be out of reach of pets and little brothers and sisters.
Once you've located the different growing environments, you'll be placing three bags in each of the five locations. One bag will contain oranges, one bread, and the other cheese. You'll need to take daily observations of the food in all of the bags.
What you need to do now, before you start the experiment, is to come up with a hypothesis, or a guess about what will happen. Do you think that the foods you keep in a dresser drawer will get as moldy as those stashed in the bathroom?

Think about where you may have observed molds and fungi in your home. Are there particular areas where you've noticed mildew or a moldy smell? If so, consider that when you're making your hypothesis. And think about what foods you may have seen molds growing on in the past. What similarities were there in those foods? Were they all kept in the refrigerator? Were they foods that had been sitting around the kitchen for a while because nobody liked them, or food that had already been cooked?
Some foods are more hospitable to molds than others, and molds grow better in some environments more than others. In your experiment, you'll be working to determine which foods molds grow best on, and in which environments.
Consider all the information you may already know. Then you can make an educated guess about the results of your experiment.
Materials You'll Need for This Project
The materials you'll need for this project are minimal and easy to get. They are as follows:
- Five slices of bread (You can use any type of bread you have available, but all five slices should be the same.)
- Five slices of orange
- Five slices of cheese
- Fifteen zipper-lock sandwich bags
- One permanent marker
You don't necessarily need to put a whole piece of bread or an entire piece of cheese into each bag. A half piece will do just fine. And you should be able to get five slices out of a single orange.
Conducting Your Experiment
Follow these steps to conduct your experiment:
Standard Procedure
Marking each bag with its proper location assures that you'll be able to return a bag to the right place in the event that your dog gets hold of it and proudly delivers it to your bedroom. Or when your little brother grabs a bag off the kitchen counter and stashes it in your mother's pocketbook.
- Using the permanent marker, label five bags “bread.”
- Label five bags “orange slice.”
- Label five bags “cheese.”
- Place a piece of bread into each of the appropriately marked bags.
- Place a piece of orange into each of the appropriately marked bags.
- Place a piece of cheese into each of the appropriately marked bags.
- Securely close and seal each bag.
- Select one bag containing bread, another containing an orange slice, and another containing cheese. Group these three bags together as SET 1.
- Repeat Step 8 to make four more sets of each food.
- Place each set of three bags in a location of your home that has a different growing environment.
- Using the permanent marker, label each bag with its location. Each set of three bags will have the same location marked on the bag.
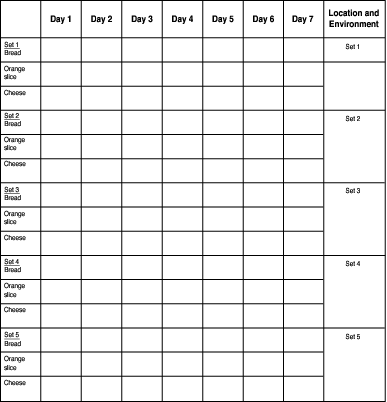
- Observe each bag once a day for two weeks. Try to look at the bags at about the same time each day in order to allow fairly equal growth time. Record everything you notice about the contents of each of the 15 bags on a chart like the one in the next section, “Keeping Track of Your Experiment.”
- At the end of two weeks, place all of the sealed lunch bags in the kitchen trash bag. Mom won't be at all happy with you if you leave bags of moldy food lying around.
It's very important that you make daily observations during the course of your experiment. The next section will show you how to keep track of those observations.
Keeping Track of Your Experiment

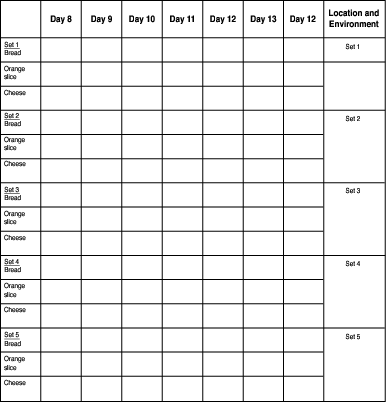
You can use the following charts to keep track of what occurs during your experiment, or you can make your own similar charts.
Use one chart to keep track of what happens during the first week, and another for the second week.
Be sure to write down as many observations as you can each day. If you see a bit of mold growing on one piece of bread, for instance, and a lot of mold growing on another, be sure to note the location of the breads, the amount of mold and what it looks like, and anything else you might see.
Don't wait until the next day, or even later the same day, to write down what you see. Take the chart with you from room to room and write down what you see as you look at each bag.

Putting It All Together
Once you've got all your observations recorded on a chart or charts, you'll be able to look closely at what you've written and summarize what you've learned from your experiment.
When you've put together your results, you'll be able to see whether your hypothesis was correct. You will have reached a conclusion, which is the last step of the scientific method. When you reach a conclusion, you will have solved the problem you described at the beginning of your project.
Whether or not your results turned out to be what you thought they would is not the most important aspect of a science fair project. Having conducted the experiment and recorded your results properly is more essential than a correct hypothesis.
Once you've reached a conclusion to your experiment, the scientific part of your project is over.
Further Investigation
If you want to take this project a step or two further, there are some easy ways to do so. You could leave some of the food enclosed—but not sealed—in bags to see if allowing air to enter the bags affects the growth of mold.
Standard Procedure
For some really cool mold and fungi facts, check out this website: www.herb.lsa.umich.edu/ kidpage/factindx.htm. It comes from the University of Michigan, and has some neat interactive activities and lots of fun information and photos.
Put some of each type of food in sealed bags, and some of each type in unsealed bags in the same location and see what happens. Doing so will determine if mold grows better in a sealed or unsealed container, and, as in your original experiment, the best types of food and environments for growing mold.
To go another step further, use a vacuum packaging machine to remove all the air from the bag in which you place the different foods. These are available in kitchen stores and some department stores, or maybe there's already one in your home. They allow you to seal food in plastic without any air, therefore keeping out any microbes—such as mold spores—that can contaminate the food.
If you want, you can try adding some of these sealed bags to your sets and see what happens. Or you can -think of your own ideas to further investigate how mold grows.
Excerpted from The Complete Idiot's Guide to Science Fair Projects © 2003 by Nancy K. O'Leary and Susan Shelly. All rights reserved including the right of reproduction in whole or in part in any form. Used by arrangement with Alpha Books, a member of Penguin Group (USA) Inc.
To order this book direct from the publisher, visit the Penguin USA website or call 1-800-253-6476. You can also purchase this book at Amazon.com and Barnes & Noble.


